Sentiment analysis with machine learning and web scraped data

Update May 2016: Kimono has been acquired by Palantir and its cloud service has been discontinued. We have made a new post covering how to create a hotel reviews sentiment analysis model with Scrapy and MonkeyLearn, check it out here.
New tools have enabled businesses of all sizes to understand how their customers are reacting to them - do customers like the location, hate the menu, would they come back? This increased volume of data is incredibly valuable but larger than any mere mortal can assess, understand and turn into action. Several technologies have emerged to help businesses unlock the meaning behind this data.
This blog looks at how KimonoLabs, which structures data at scale, and MonkeyLearn, which provides machine learning capabilities for text analysis, can be used together to translate data into insight.
Kimono + MonkeyLearn
Kimono is a smart web scraper for getting data from the web by turning websites into APIs. By using Kimono point-and-click tool, users can select the data they want to scrape from a website and Kimono does the rest, turning websites into APIs in seconds.
MonkeyLearn is a platform for getting relevant data from text using machine learning. MonkeyLearn goal is to enable developers with any level of experience to easily extract and classify information from text for their specific needs, and integrate the results into their own platforms and applications in an easy, fast and cost-effective way.
There is a natural fit between Kimono and MonkeyLearn; with Kimono you can extract information from the web and with MonkeyLearn you can create and use machine learning models to enrich that information with sentiment analysis, topic detection, language detection, keyword detection, entity recognition and more.
Combine both services and the possibilities are endless.
How to create a hotel sentiment analysis detector with Kimono and MonkeyLearn
Our objective with this tutorial is to create a tool that performs sentiment analysis of hotel reviews.
We will use Kimono to extract hotel reviews from TripAdvisor and use those reviews as text data to create a machine learning model with MonkeyLearn. This model will learn to detect if a hotel review is positive or negative and will be able to understand the sentiment of new and unseen hotel reviews.
1. Create a Kimono API
The first step is to scrape hotel reviews from TripAdvisor by creating a Kimono API:
Install the Kimono chrome extension For more information on how to install Kimono extension visit this article.
Use Kimono on a webpage To use kimono, navigate to the webpage you want to extract data from, and then click on the chrome extension. In this tutorial we will use New York Inn reviews to create our hotel sentiment analysis classifier.
Select the data you want to scrape with Kimono If you need help with this step, follow this simple tutorial. In our case we will extract the review title, the review content and the stars:

TripAdvisor review
In order to do that, we will have to add three properties "title", "content" and "stars", and mark the corresponding fields on the web page. Kimono will recognize similar fields for every review on the current page:
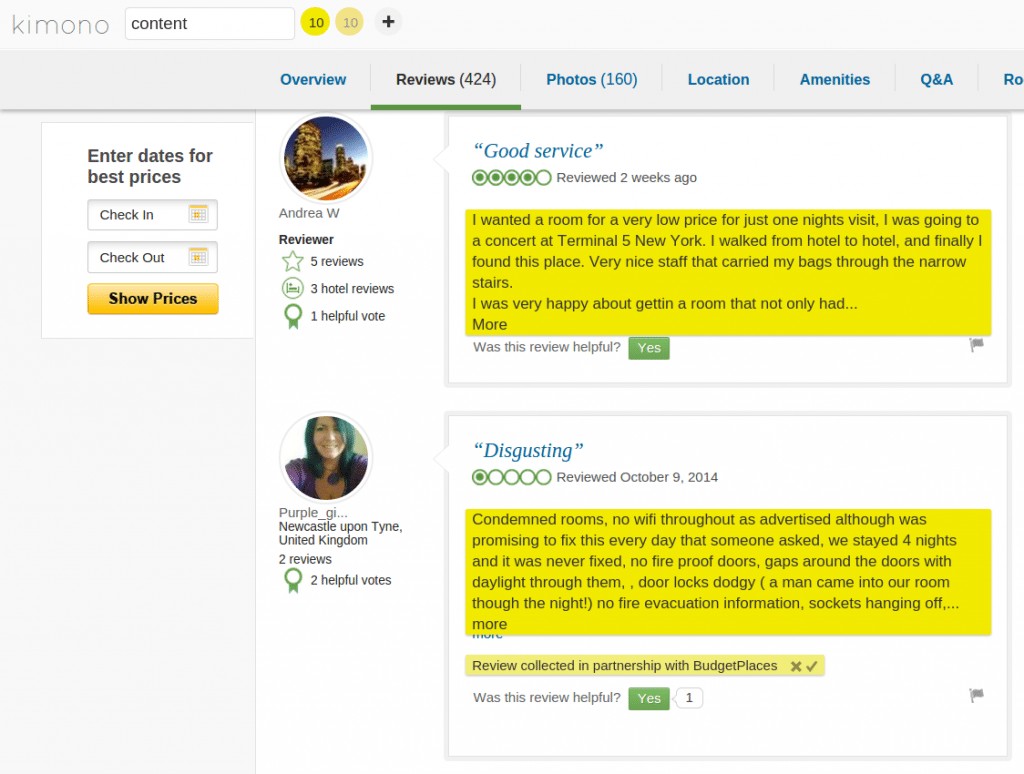
Creating the spider with Kimono
After marking all the properties, we have to mark the pagination link, that is, the link that will get the crawler to the next page of reviews. You can do that by marking the next page link with Kimono's pagination activation icon:
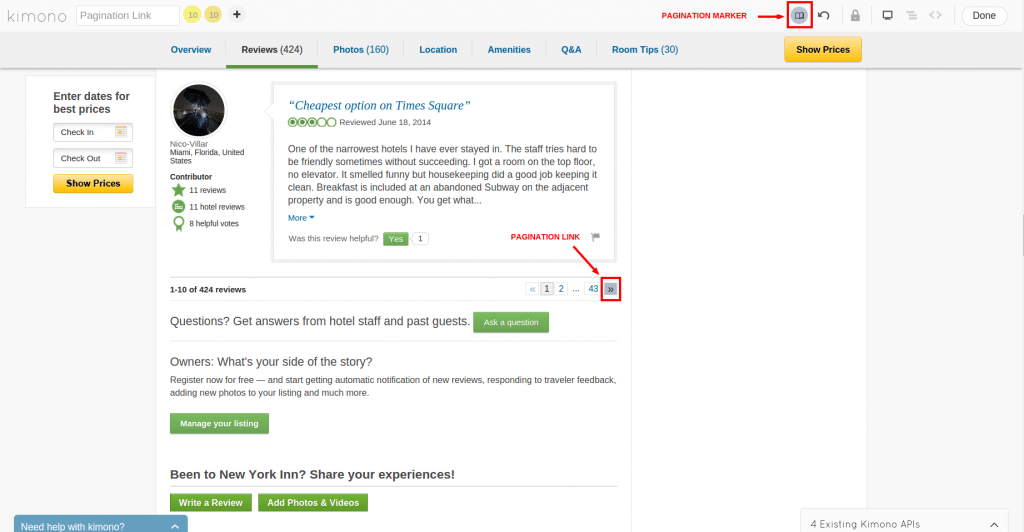
Working the pagination marker
Before we create our Kimono API, we have to do some advanced configurations in the stars attribute to get the alt value, that is, we want to get strings like "1 of 5 stars" or "5 of 5 stars". You can do that by clicking the Data Model View and configuring the advanced attributes for the stars property:
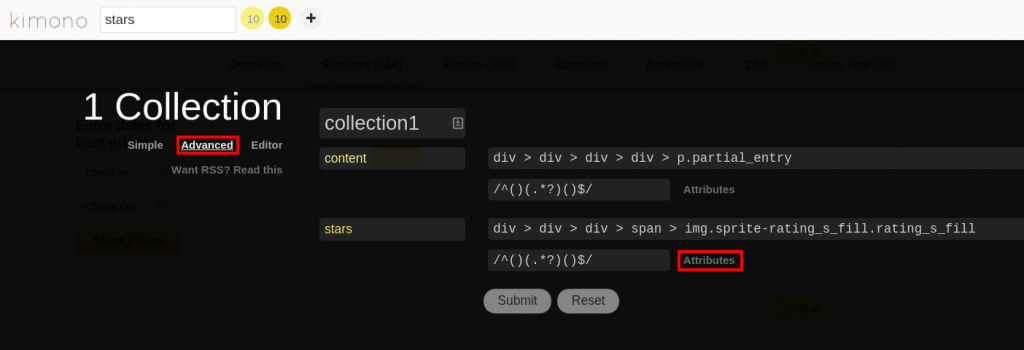
Working with the stars attribute
You can go to the Raw Data View to verify that our crawler gets the correct property values:
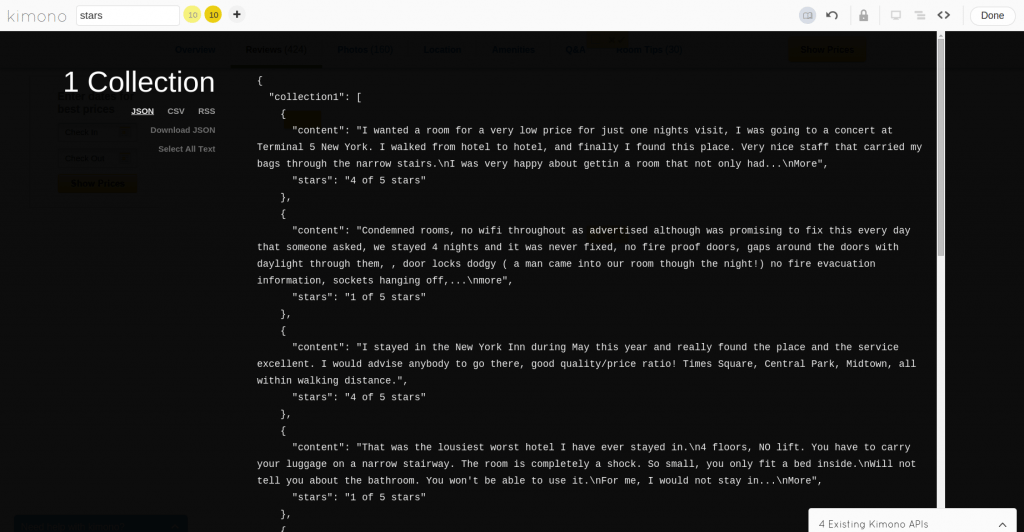
Verifying that our crawler is working correctly
And we are done! Now just click the Done button. On the creation form, select manual crawl as your API setting and set the crawl limit to 50 pages max:
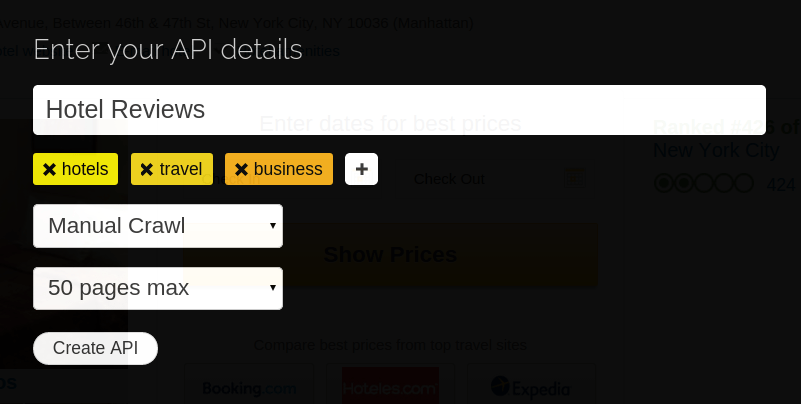
Creating our API
2. Getting the Data
So we have our Kimono spider created, we are ready to start crawling and gathering the data. You just have to go the Crawl Setup tab in your API Detail and hit the Start Crawl button:
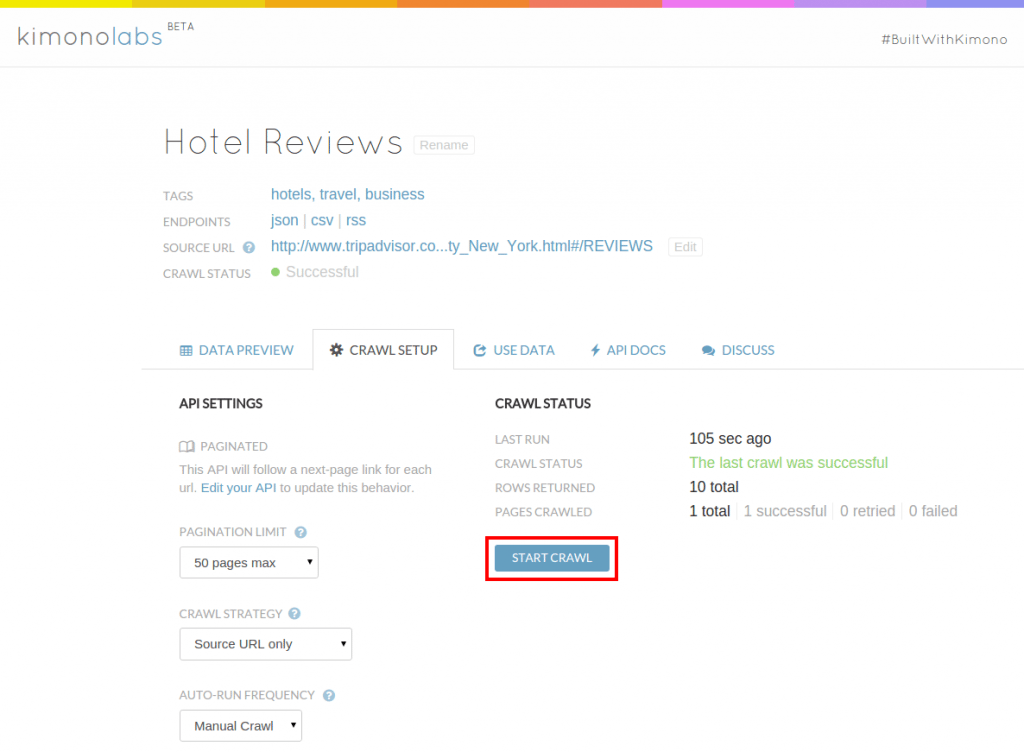
Starting to crawl the data with our spider
The crawl will start, it will take a few seconds to finish. To get the retrieved data, go to the Data Preview tab, select the CSV format and click the Download link:
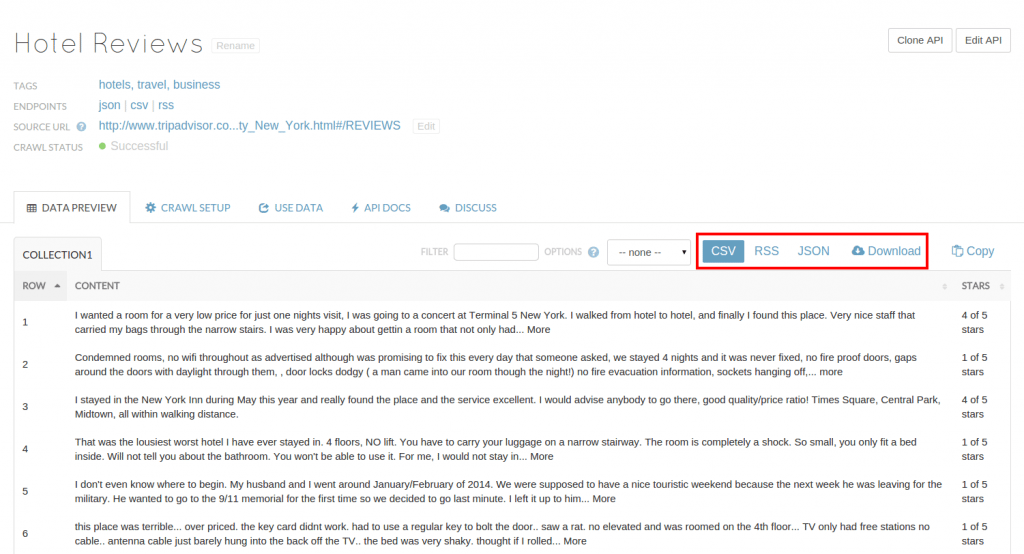
_Getting the retrieved data_
3. Preparing the Data
So we downloaded our kimonoData.csv file, now it's time to preprocess the data. We'll do that with Python and Pandas library.
First we import the CSV file into a data frame, remove duplicates, drop the reviews that are neutral (3 of 5 stars):
import pandas as pd

# We use the Pandas library to read the contents of the scraped data
# obtained by Kimono, skipping the first row (which is the name of
# the collection).
df = pd.read_csv('kimonoData.csv', encoding='utf-8', skiprows=1)

# Now we remove duplicate rows (reviews)
df.drop_duplicates(inplace=True)

# Drop the reviews with 3 stars, since we're doing Positive/Negative
# sentiment analysis.
df = df[df['stars'] != '3 of 5 stars']
Then we create a new column that concatenates the title and the content:
# We want to use both the title and content of the review to
# classify, so we merge them both into a new column.
df['full_content'] = df['title'] + '. ' + df['content']
Then we create a new column that will be what we want to predict: Good or Bad, so we transform reviews with more than 3 stars into Good, and reviews with less than 3 stars into Bad:
def get_class(stars):
    score = int(stars[0])
    if score > 3:
        return 'Good'
    else:
        return 'Bad'

# Transform the number of stars into Good and Bad tags.
df['true_tag'] = df['stars'].apply(get_class)
We'll keep only the full_content and true_tag columns:
df = df[['full_content', 'true_tag']]
If we take a look at the data frame we created it may look something like this:
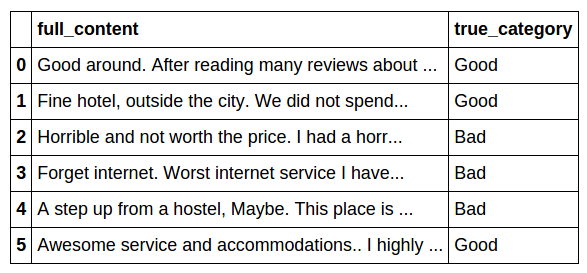
To have a quick overview of the data, we have 429 Good reviews and 225 Bad reviews:
# Print a histogram of sentiment values
df['true_tag'].value_counts()
Good    429
Bad     225
dtype: int64
Finally, we have to save our dataset in MonkeyLearn's format, so we remove the headers and the index column. The first column must be the text contents and the second must be the tag. We will encode the text in UTF-8:
# Write the data into a CSV file
df.to_csv('kimonoData_MonkeyLearn.csv', header=False, index=False, encoding='utf-8')
4. Creating a MonkeyLearn Classifier
Ok, time to move to MonkeyLearn, we want to create a text classifier that classifies reviews into two possible tags: Good or Bad, depending on that the review is talking in a positive or negative way respectively. That process is known as Sentiment Analysis, that is, extracting the mood from a text.
First you have to signup into MonkeyLearn, after you log in you will get into the main dashboard. MonkeyLearn has precreated text mining models, but also allows you to create customized ones. In our case, we will build a custom text classifier, so within Classification page, click the Create Model button:
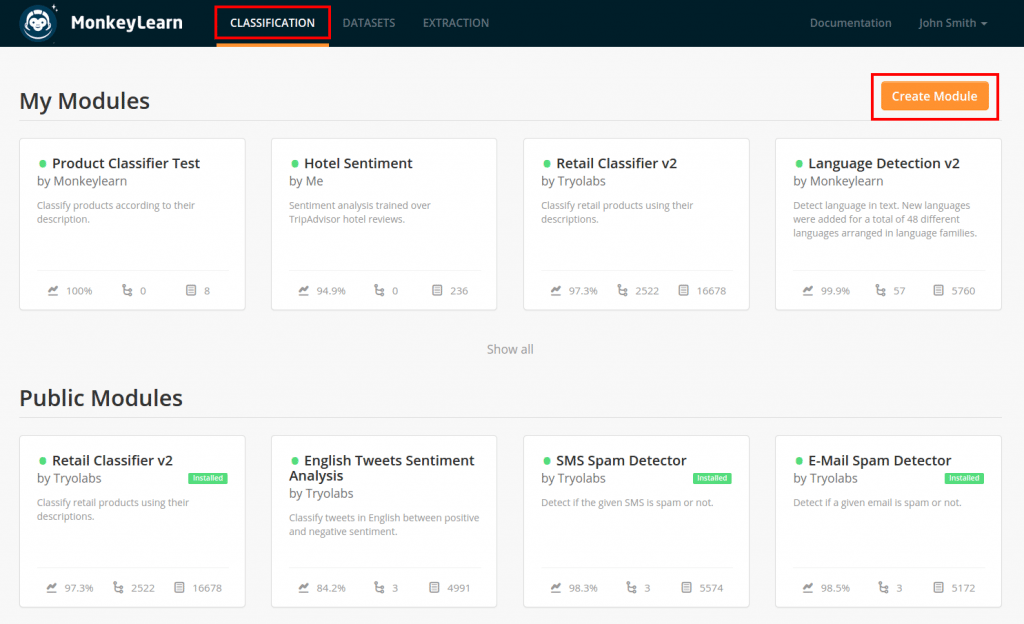
Creating a text classifier with MonkeyLearn
A form will pop up to fill the initial settings, we first select English as our working language and name our new model as "Hotel Sentiment":
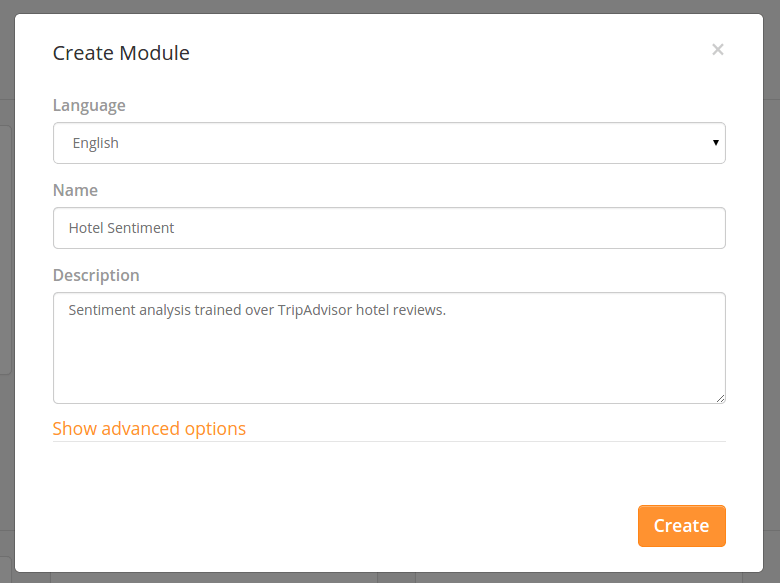
Creating a text classifier with MonkeyLearn
Also, we will set some advanced options, click the Show advanced options link and:
- Set N-gram range to 1-3.
- Disable Use stemming.
- Enable Filter stopwords, and use Custom stopwords: "the, and".
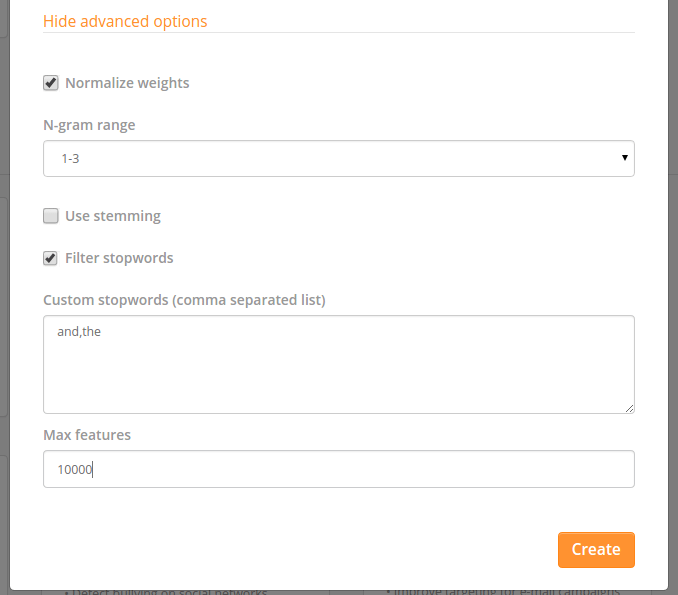
_Setting up the advanced options of our classifier_
After clicking the Create button, we will be in the model detail page.
5. Feeding MonkeyLearn with Kimono
Time to feed the monkey, go to the Actions menu and select Upload data, then select the CSV file we created with Kimono's data:
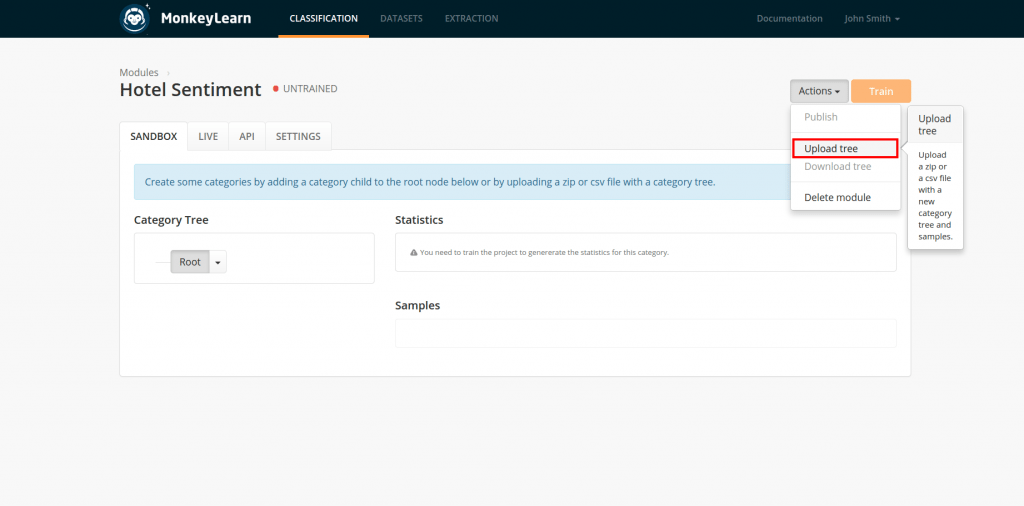
Adding text data to our classifier
After the uploading finishes, MonkeyLearn will create the corresponding list of tags at the left, where we will have our two sentiment categories: Good and Bad. If you click on each of the tags, you will see the corresponding texts (the reviews we gathered with Kimono) on a list on the bottom right of the screen:
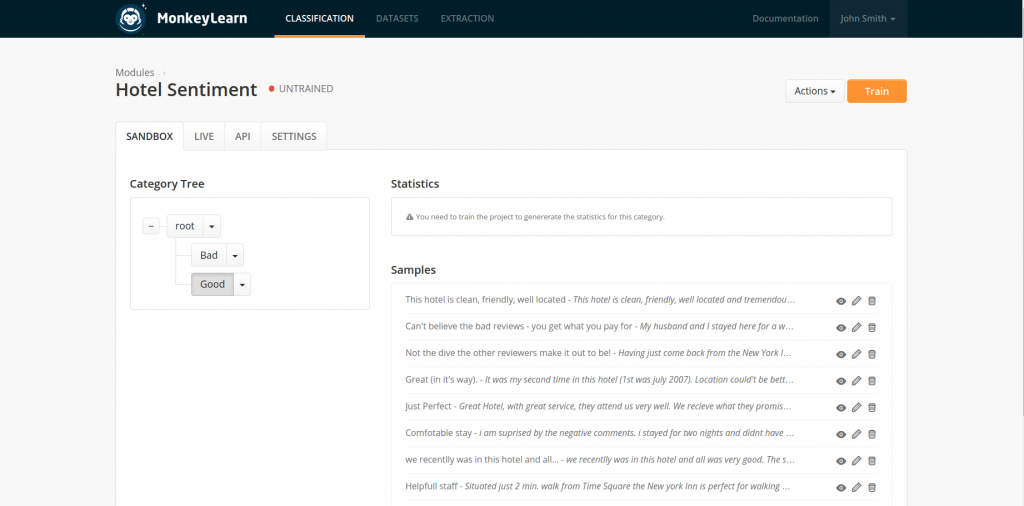
Visualizing our text data
6. Train MonkeyLearn
Ok, now an easy step: training the machine learning algorithm. This only involves hitting the Train button at the top right of the screen. You will see a progress bar while the machine learning algorithms are training the model in MonkeyLearn's cloud. It will take a few seconds or a few minutes depending on your texts and the number of tags in your model.
After finishing the training, the model state will change to TRAINED, and you'll get some statistics that show how well the model is doing in predicting the correct tag (in our case the sentiment):
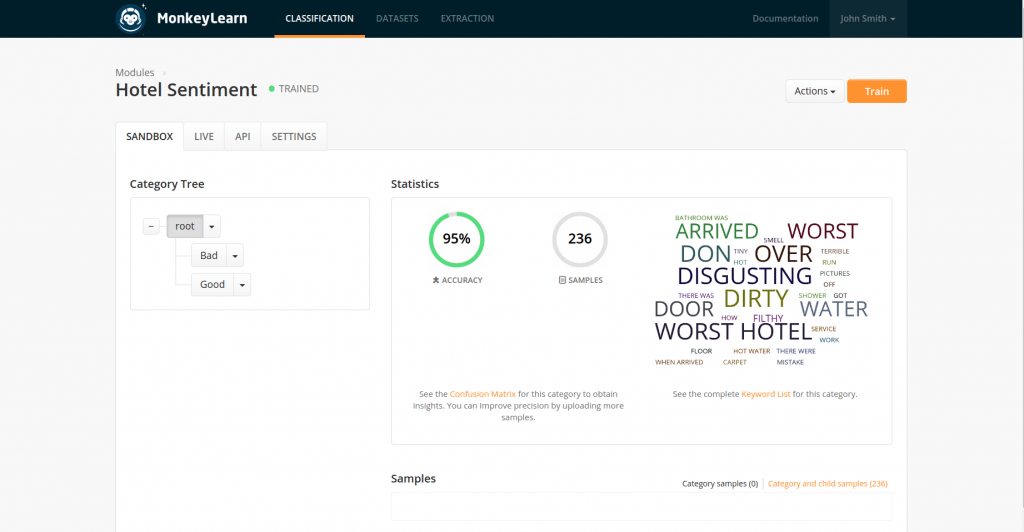
Our trained classifier
The metrics are Accuracy, Precision and Recall, these measurements are common in machine learning for evaluating the performance of classification algorithms.
You can also see a keyword cloud on the right, that shows some of the terms that will be used to characterize the texts and predict the sentiment of the text. As you can see, they are terms that are semantically associated with positive and negative expressions about hotel features. Those terms are automatically obtained with statistical algorithms within MonkeyLearn.
If you want to look at the finished classifier, we created a public classifier with the hotel sentiment analysis.
7. Testing our Sentiment Analysis
And voilá, we have our sentiment analysis classifier with zero lines of code. We can test the model directly from the GUI within MonkeyLearn. Go to the API tab, there you write or paste a text, submit and you'll get the prediction, for example:
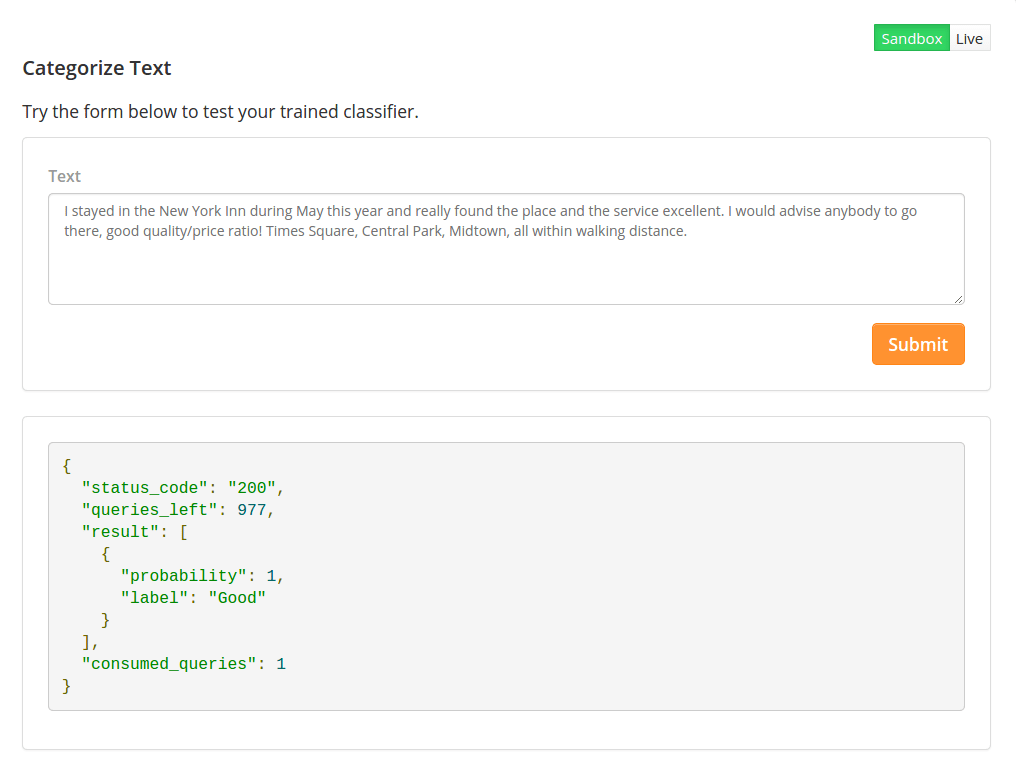
Trying out our machine learning model
The results shows what a call to the classification endpoint from MonkeyLearn's API would respond. What is important now is to take a look at the “result” entry that shows the predicted label, in this case "Good", and the corresponding probability: 1. The label in our case will always be Good or Bad, and the probability is a real number between 0 and 1. 1 means that is 100% sure about the prediction.
You the classifier may still have some errors, that is, classify good reviews as bad, and vice versa, but the good thing is that you can keep improving, if you gather more text data with tools like Kimono (in our example, by getting reviews from more hotels), you can upload more texts to the classifier, retrain and improve the results. Also, you can try different configurations on the advanced settings of your classifier, and retrain the algorithm. Usually different settings work for different classification problems (it's not the same to do topic detection or sentiment analysis).
8. Integrating the model with MonkeyLearn's API
You can do the same but programmatically, so you can easily integrate any MonkeyLearn model within your projects with any programming language. For example, if we are working with Python programming language, you can go to a bit down to the API libraries, select the corresponding programming language and copy and paste the code snippet:
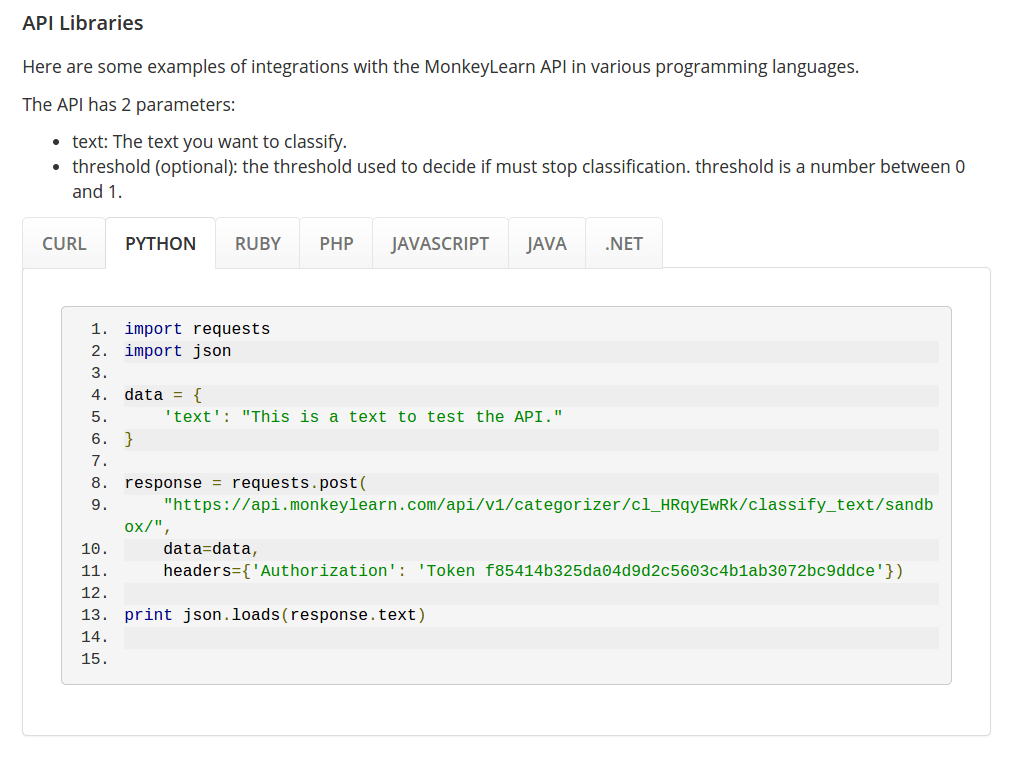
Using the classifier via the API
Conclusion
We combined Kimono and MonkeyLearn to create a machine learning model that learns to predict the sentiment of a hotel review. Kimono helped us to easily retrieve the text data from the web and MonkeyLearn helped us to build the actual sentiment analysis classifier.
But this is just the tip of the iceberg. There's much more we can do.
If you are a Kimono user, you can use MonkeyLearn pre-trained models to easily enrich your Kimono APIs and add sentiment analysis, topic detection, language detection, keyword extraction, entity recognition (and others) to the information you extract from the web with Kimono. If you have a specific need, you can create a custom model with MonkeyLearn to process the information you extract the way you need.
If you are a MonkeyLearn user, you can use Kimono to easily extract texts to train your custom models and create powerful machine learning models in just a few minutes.
Have any cool ideas on how to combine Kimono and MonkeyLearn? Share them with us in the comments.

Raúl Garreta
December 17th, 2014


